Azure and Weave GitOps Enterprise InstallationEnterprise
Once you successfully create your Kubernetes cluster in Azure Marketplace, follow these steps to Install Weave GitOps Enterprise. These instructions apply to both Azure AKS and Azure ARC clusters—they'll behave in the same way.
If you have already installed Flux, then Azure Flux will refuse to install.
1. Choose the “GitOps” Option in the Marketplace
Search for Weave GitOps Enterprise in the "Extensions + Applications" of the Azure Marketplace. Click the "GitOps" option. This will take you to a screen that presents a first-class item called Type: Flux v2.
Click GitOps => Create.
Add the config name, namespace (default), scope: cluster, type (Flux v2), and continuous reconciliation option. Your entries should look like this:
- Configuration: flux-system
- Namespace: flux-system
- Scope: Cluster
All of the displayed properties for the Flux objects screen are the same as what you'd supply to Flux bootstrap.
Optional: Install CAPZ, the CAPI Provider
If you are planning to manage or connect CAPI clusters to the WE service make sure you first install the CAPI provider. Then during the WE installation process be sure to select the "Enable CAPI support" checkbox.
2. Apply the Entitlements Secret
Contact info@weaveworks.org for a valid entitlements secret. This will come in the form of a file “entitlements.yaml”. Apply it to the cluster:
kubectl apply -f entitlements.yaml
3. Configure Access for Writing to Git from the UI
(This section is the same as what you'll find in the main WGE install documentation.)
Here we provide guidance for GitHub, GitLab, BitBucket Server, and Azure DevOps.
- GitHub
- GitLab
- BitBucket Server
- Azure DevOps
GitHub requires no additional configuration for OAuth Git access
Create a GitLab OAuth application that will request api permissions to create pull requests on your behalf.
Follow the GitLab docs.
The application should have at least these scopes:
apiopenidemailprofile
Add callback URLs to the application for each address the UI will be exposed on, e.g.:
https://localhost:8000/oauth/gitlabfor port-forwarding and testinghttps://git.example.com/oauth/gitlabfor production use
Save your application, taking note of the Client ID and Client Secret. Save
them into the git-provider-credentials secret, along with:
GIT_HOST_TYPESto tell WGE that the host is gitlabGITLAB_HOSTNAMEwhere the OAuth app is hosted
Replace values in this snippet and run:
kubectl create secret generic git-provider-credentials --namespace=flux-system \
  --from-literal="GITLAB_CLIENT_ID=13457" \
  --from-literal="GITLAB_CLIENT_SECRET=24680" \
  --from-literal="GITLAB_HOSTNAME=git.example.com" \
  --from-literal="GIT_HOST_TYPES=git.example.com=gitlab"
Create a new incoming application link from
the BitBucket administration dashboard. You will be asked to enter a unique name and the redirect URL for the external application. The redirect URL
should be set to <WGE dashboard URL>/oauth/bitbucketserver. You will also need to select permissions for the application. The minimum set of
permissions needed for WGE to create pull requests on behalf of users is Repositories - Write. An example of configuring these settings is shown below.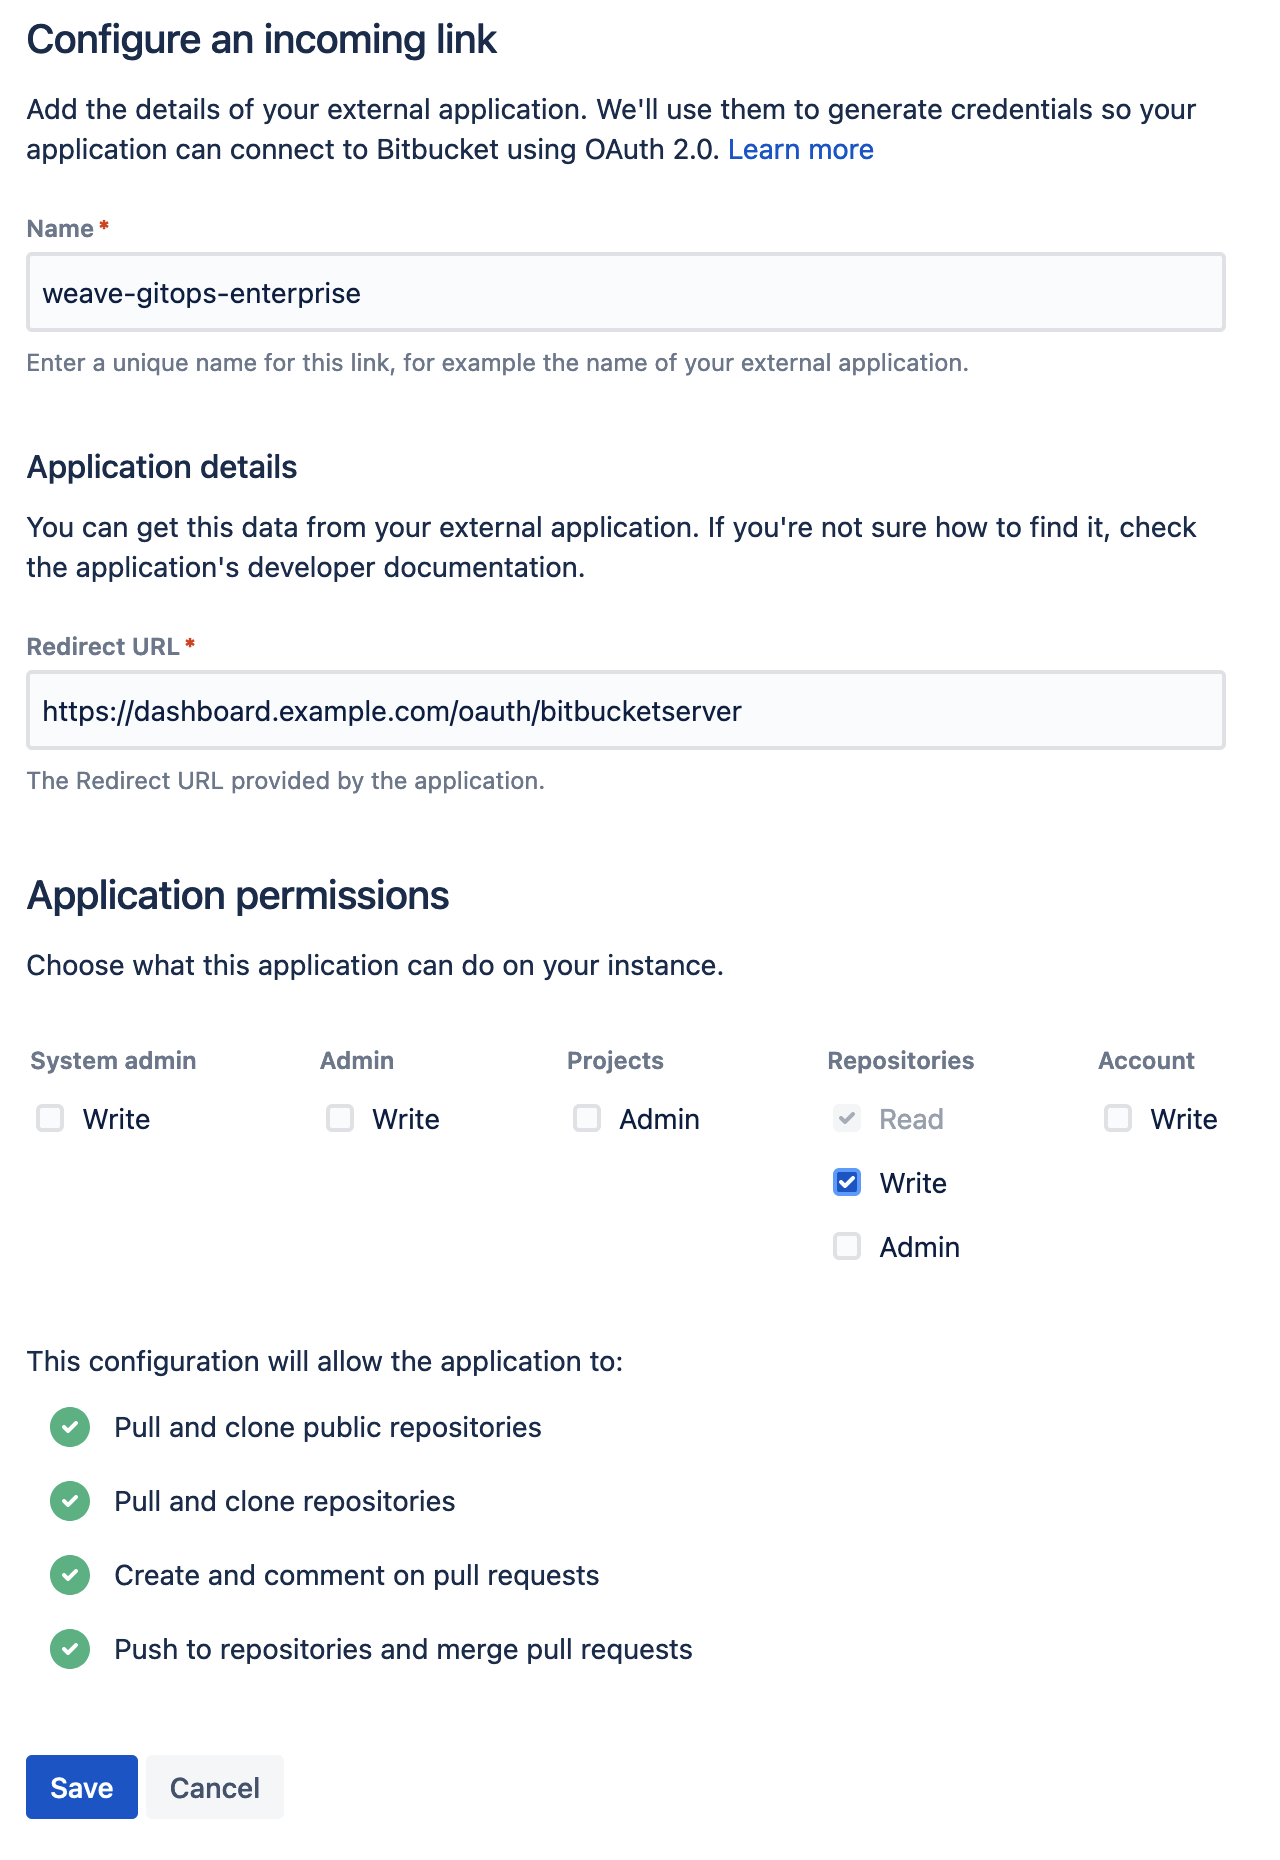
Save your application and take note of the Client ID and Client Secret. Save
them into the git-provider-credentials secret, along with:
GIT_HOST_TYPESto tell WGE that the host is bitbucket-serverBITBUCKET_SERVER_HOSTNAMEwhere the OAuth app is hosted
Replace values in this snippet and run:
kubectl create secret generic git-provider-credentials --namespace=flux-system \
  --from-literal="BITBUCKET_SERVER_CLIENT_ID=13457" \
  --from-literal="BITBUCKET_SERVER_CLIENT_SECRET=24680" \
  --from-literal="BITBUCKET_SERVER_HOSTNAME=git.example.com" \
  --from-literal="GIT_HOST_TYPES=git.example.com=bitbucket-server"
If the secret is already present, use the following command to update it using your default editor:
kubectl edit secret generic git-provider-credentials --namespace=flux-system
If BitBucket Server is running on the default port (7990), make sure you include the port number in the values of the secret. For example: GIT_HOST_TYPES=git.example.com:7990=bitbucket-server
Navigate to VisualStudio and register a new application, as explained in the docs. Set the authorization callback URL and select which scopes to grant. Set the callback URL to <WGE dashboard URL>/oauth/azuredevops.
Select the Code (read and write) scope from the list. This is necessary so that WGE can create pull requests on behalf of users. An example of configuring these settings is shown below.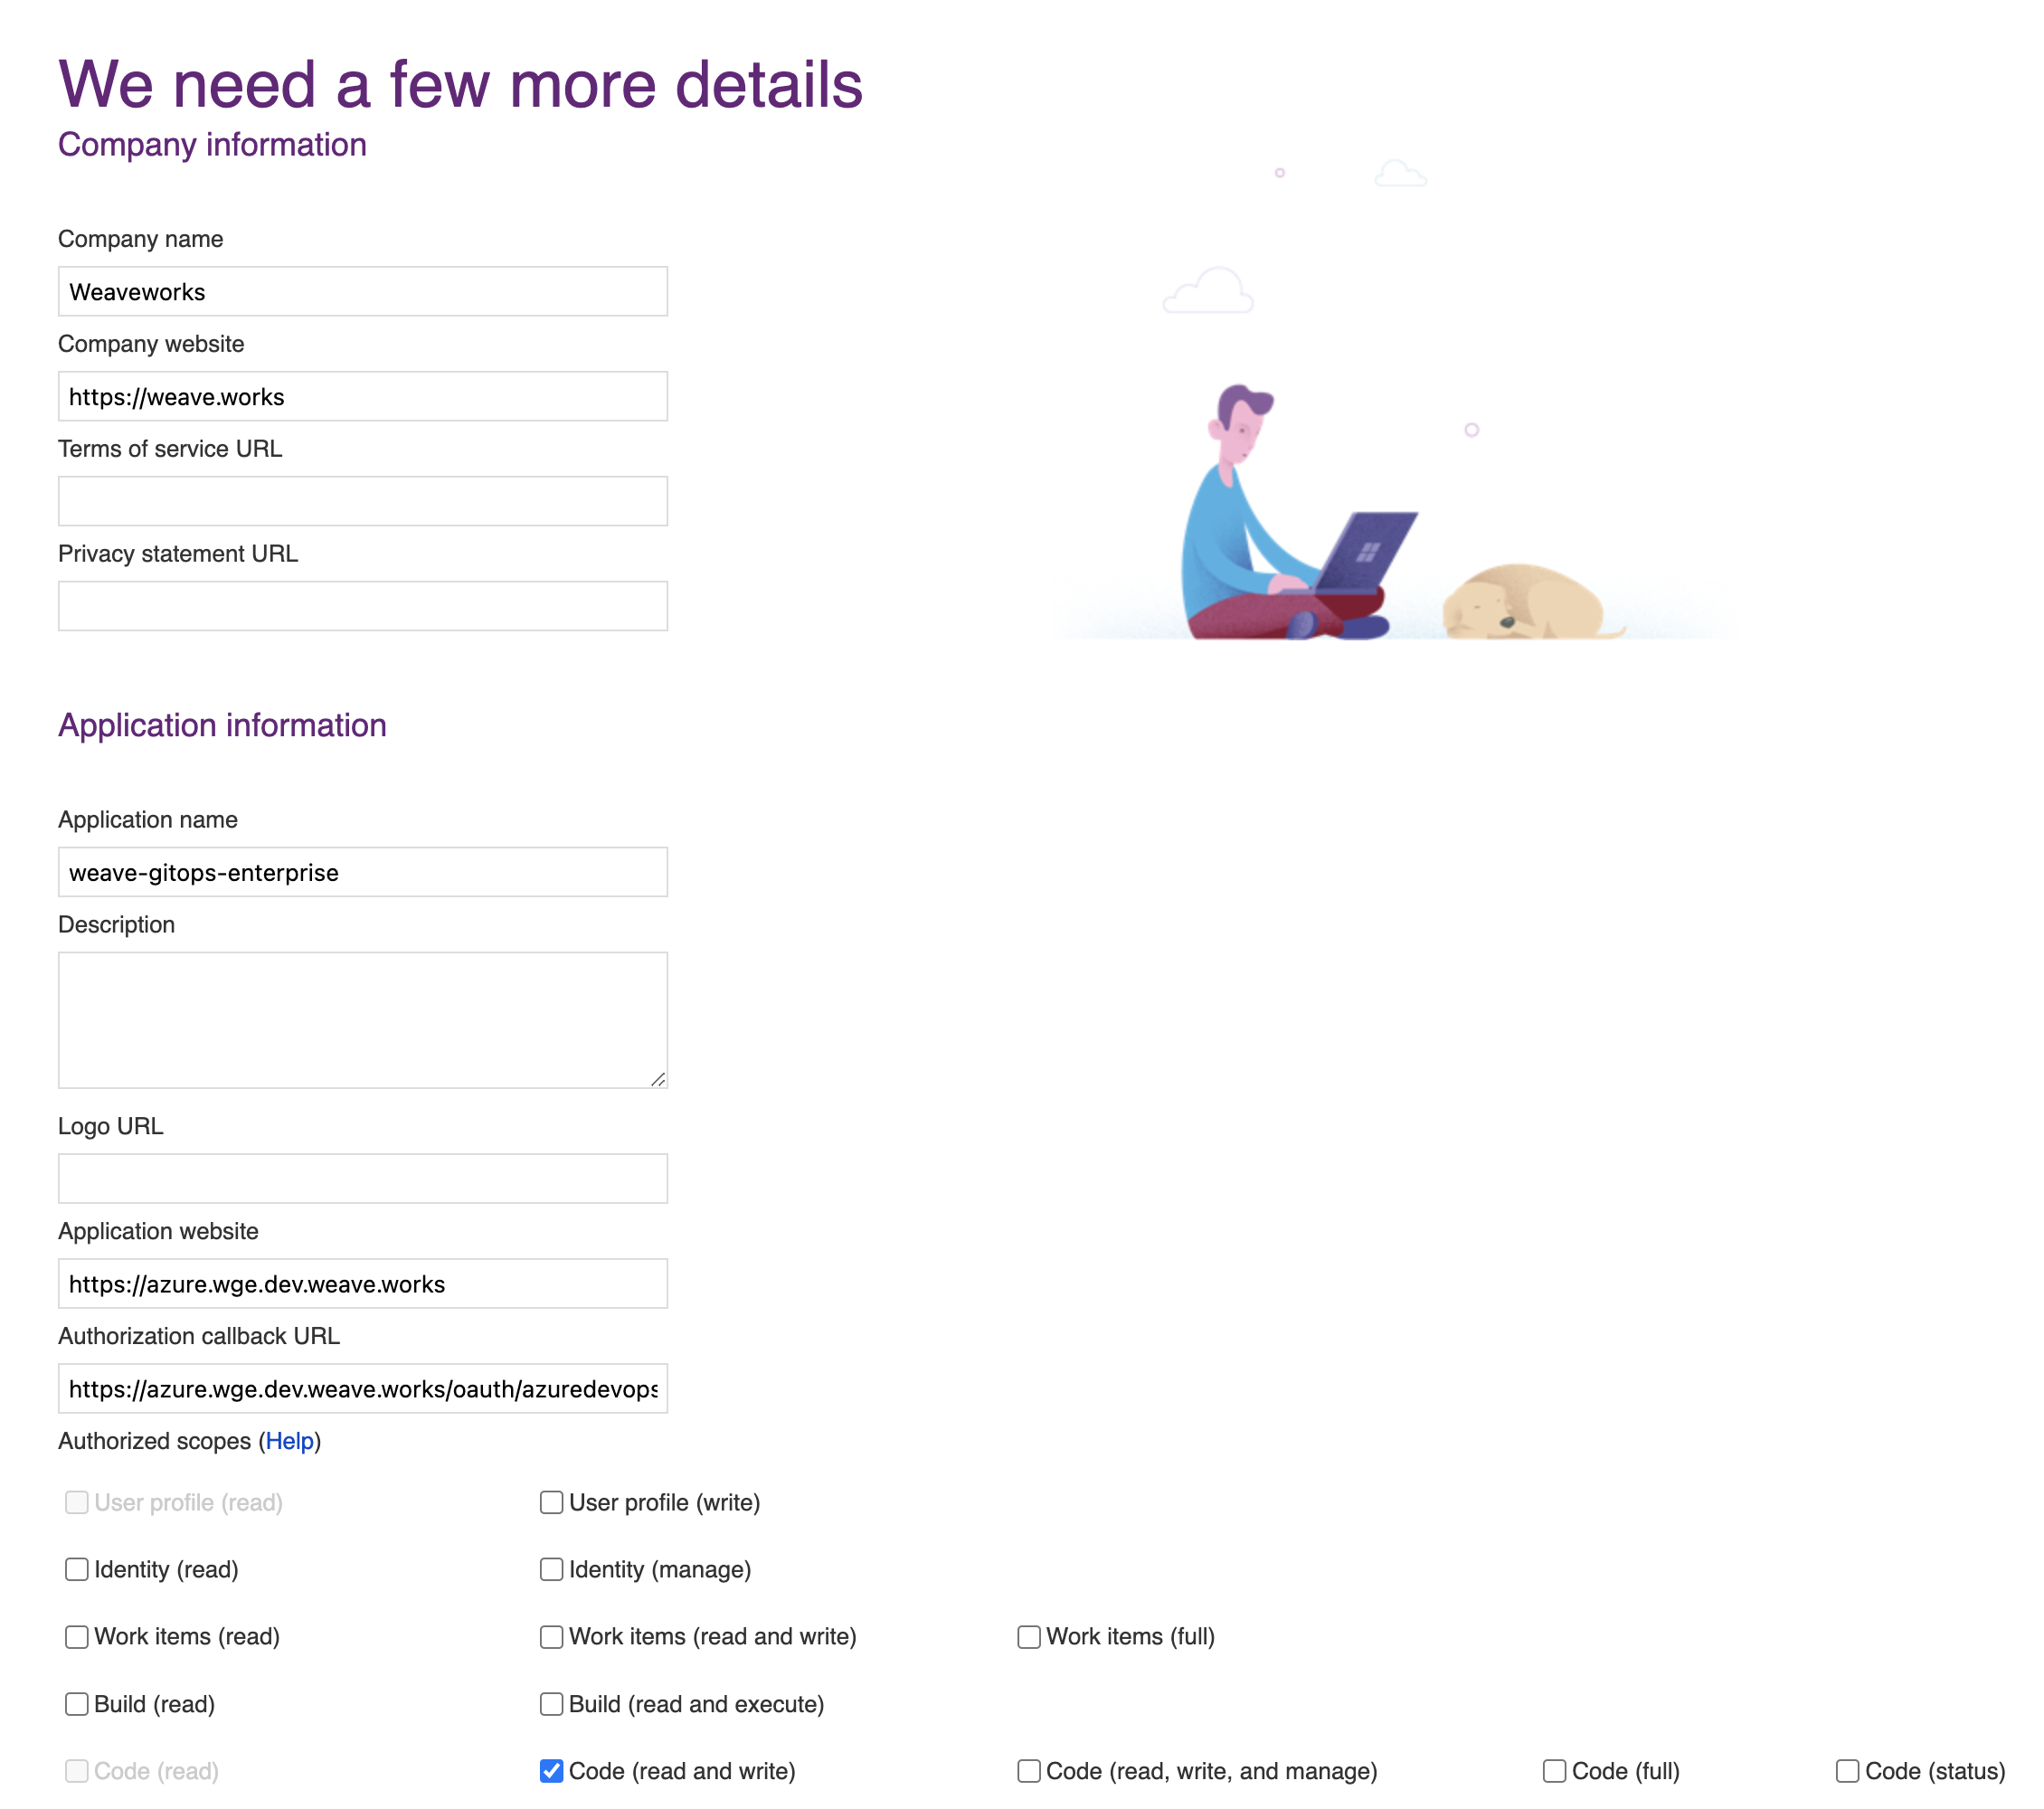
After creating your application, you will be presented with the application settings. Take note of the App ID and Client Secret values—you will use them to configure WGE.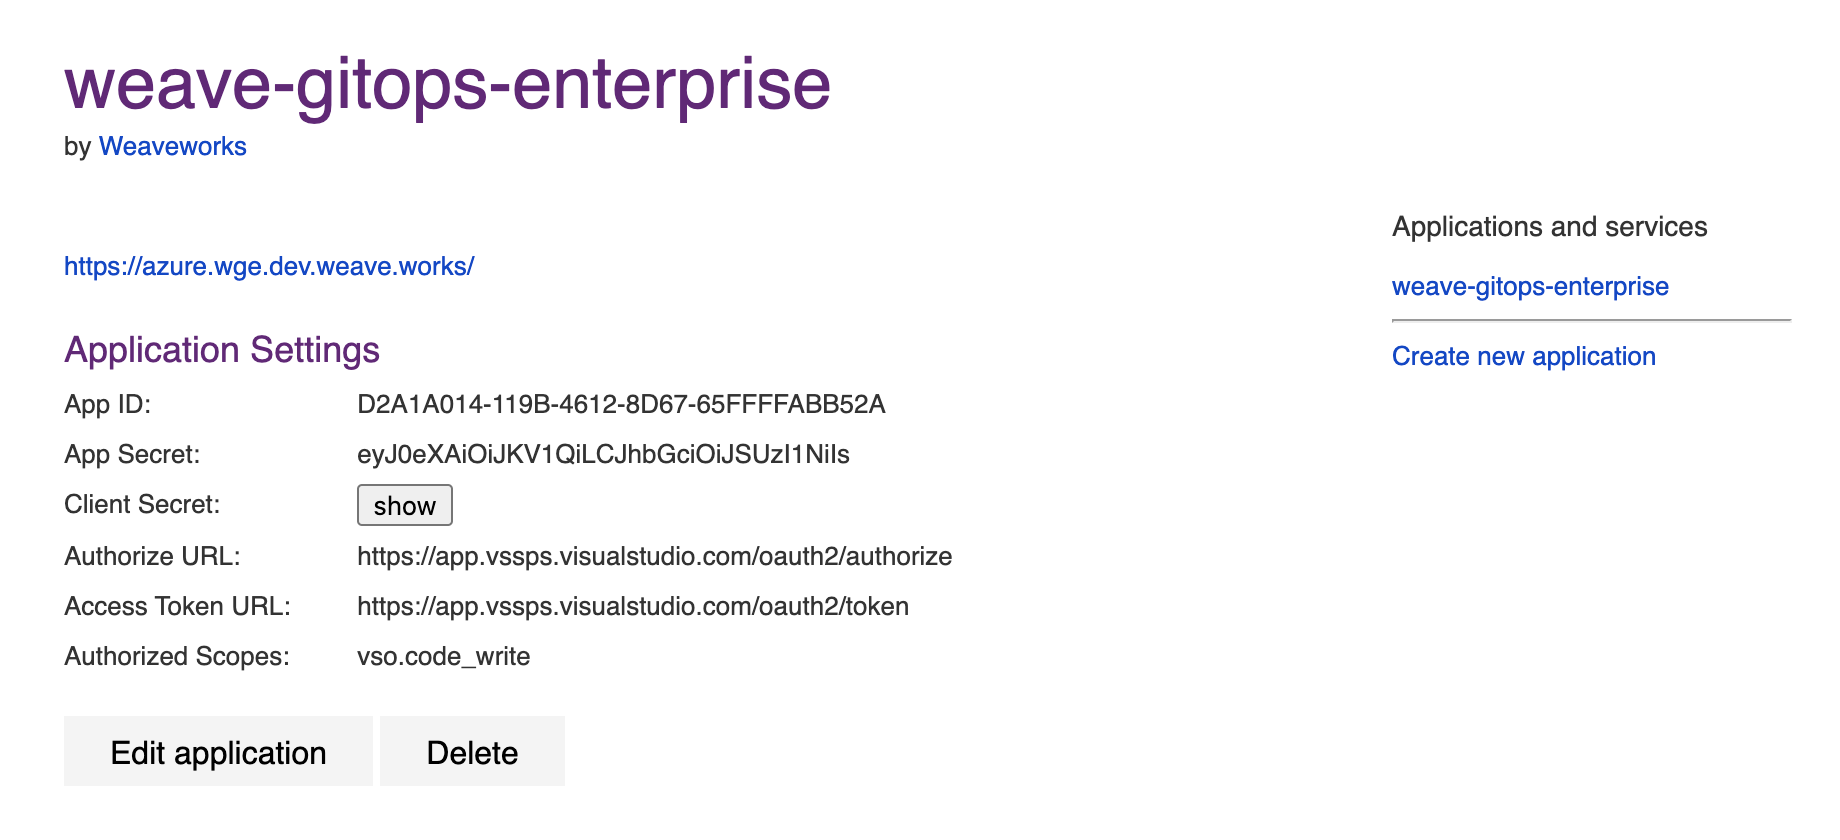
In your cluster, create a secret named git-provider-credentials that contains the App ID and Client Secret values from the newly created application.
Replace values in this snippet and run:
kubectl create secret generic git-provider-credentials --namespace=flux-system \
  --from-literal="AZURE_DEVOPS_CLIENT_ID=<App ID value>" \
  --from-literal="AZURE_DEVOPS_CLIENT_SECRET=<Client Secret value>"
WGE is now configured to ask users for authorization the next time a pull request must be created as part of using a template. Note that each user can view and manage which applications they have authorized by navigating to https://app.vsaex.visualstudio.com/me.
4. Configure Your Password
First, install the Weave GitOps Enterprise CLI tool. To do this, you can use either brew or curl.
- Homebrew
- curl
brew install weaveworks/tap/gitops-ee
curl --silent --location "https://artifacts.wge.dev.weave.works/releases/bin/0.27.0/gitops-$(uname)-$(uname -m).tar.gz" | tar xz -C /tmp
sudo mv /tmp/gitops /usr/local/bin
gitops version
Now, to login to the WGE UI, generate a bcrypt hash for your chosen password and store it as a secret in the Kubernetes cluster. There are several different ways to generate a bcrypt hash. Here, we'll use gitops get bcrypt-hash from our GitOps CLI.
PASSWORD="<Make up and insert a brand-new password here>"
echo -n $PASSWORD | gitops get bcrypt-hash | kubectl create secret generic cluster-user-auth -n flux-system --from-literal=username=wego-admin --from-file=password=/dev/stdin
A validation to know it’s working:
kubectl get secret -n flux-system cluster-user-auth
5. Install Weave GitOps Enterprise to Your Cluster
First, you'll get taken to the Weaveworks portal on the Azure platform, which provides your subscription details.
Search for Weave GitOps. Pick "View private products" and choose WGE. Fill out the forms, selecting your cluster, then choose "Review and Create".
6. Apply Extra Configuration
Additional configuration is done through an optional ConfigMap:
apiVersion: v1
kind: ConfigMap
metadata:
  name: cluster-service-extra-config
  namespace: flux-system
data:
  # disable TLS
NO_TLS: "true"
Apply the configuration with:
kubectl apply -f cluster-service-extra-config.yaml

# restart the clusters-service for changes to take effect
kubectl -n flux-system rollout restart deploy/weave-gitops-enterprise-mccp-cluster-service
Available Configuration Options
| value | default | description |
|---|---|---|
NO_TLS | "false" | disable TLS |
CLUSTER_NAME | "management" | name of the management cluster |
AUTH_METHODS | "token-passthrough,user-account" | Which auth methods to use, valid values are 'oidc', 'token-pass-through' and 'user-account' |
OIDC_ISSUER_URL | "token-passthrough,user-account" | The URL of the OpenID Connect issuer |
OIDC_CLIENT_ID | "token-passthrough,user-account" | The client ID for the OpenID Connect client |
OIDC_CLIENT_SECRET | "token-passthrough,user-account" | The client secret to use with OpenID Connect issuer |
OIDC_REDIRECT_URL | "token-passthrough,user-account" | The OAuth2 redirect URL |
OIDC_TOKEN_DURATION | "1h" | The duration of the ID token. It should be set in the format: number + time unit (s,m,h) e.g., 20m |
OIDC_CLAIM_USERNAME | "email" | JWT claim to use as the user name. By default email, which is expected to be a unique identifier of the end user. Admins can choose other claims, such as sub or name, depending on their provider |
OIDC_CLAIM_GROUPS | "groups" | JWT claim to use as the user's group. If the claim is present it must be an array of strings |
CUSTOM_OIDC_SCOPES | "groups, openid, email, profile" | Customise the requested scopes for then OIDC authentication flow - openid will always be requested |
7. Check That It Works
Go to the "services and ingresses" tab in the Azure portal and look for signs that the UI installed.
Troubleshooting
WGE will try and automatically install Flux on a new cluster. If this fails for some reason, or if you need a custom Flux installation, you can manually install it before installing WGE.
Click "Next" and add:
- Source Kind: Git repository
- Repository URL: [your repository URL here]
- Reference Type: Branch
- Repository Type: Private
And under the "Authentication" section:
- Authentication Source: Provide Authentication here
- SSH Key Authentication: Let the operator generate SSH Keys
- HTTPS User: YOUR_GITHUB_USERNAME
- HTTPS Key: YOUR_GITHUB_USER_PAT (Get one at this link. It's not the most secure method, but the easiest to get going.)
Click "Next". You'll see an option to create a Kustomisation, which is optional. To create one:
- Click Create
- Instance name: flux-system
- Path: clusters/default/demo3-azure-flux
- Prune: Ticked
Click "Save". Then clicking "Next", which will give you a summary so you can review your input. Then click "Create". It will take about five minutes to deploy.
You'll get to a new screen, which at the top-right shows "Notifications" and will display creation of the Flux configuration. When your deployment succeeds, go to the resource and pin to your dashboard. Then go to your terminal to see if it works in kubectl. In the terminal you'll get the GitRepository and Kustomizations. You should then get a green "succeeded" checkmark.
The Kustomisations screen does not provide an option to inspect the path/target namespace—you have to supply the target Namespace in the Kustomization object.
Next Steps
From this point, you can follow our generalized WGE installation instructions to configure TLS and log into the UI. Installing the Azure Marketplace product installs the Helm chart.